 . . . .
World's Largest Selection of Wicks!
Wicks for virtually every heater, stove and lamp made since 1850
USE, CARE
and WICKING of CENTER DRAFT LAMPS
Jump to the following articles on this page. But
before you just start polishing and cleaning the outside of the lamp,
you should read the page on
Beginning Lamp Restoration.
|
WARNINGS |
|
Never refuel a
lamp when it is burning.
That is why Kosmos lamps do not have a separate fill cap.
Fires an happen to the nicest people - even old lamp people! |
Never fill a lamp
all the way to the top.
Leave
1/2" of empty space to enable the fuel to expand as it warms
up. The heat from a burning lamp also heats the fuel. |
Clean spilled fuel
from the lamp.
Fuel
residue will tarnish the finish over time. Nickel plate will
peel off, brass and copper will tarnish, ruining a
pretty lamp! |
|
Start a lamp burning
at a low setting!
Let it warm up the chimney
and fount before turning it up to a higher flame. |
Never leave a lamp burning unattended
for at least 10 minutes or until the
flame has stabilized. As the lamp warms up, so does the
fuel, and thinner fuel is more volatile. You may have to
lower the wick several times as the lamp and fuel get warm
before the flame will be stable. |
CLEANING AND POLISHING OLD
BRASS
Old lamps should be cleaned and polished to fill the
pores of the metal so it will not corrode. A liquid car polish/cleaner
such as Mequair's will clean the metal without destroying the patina,
then leave a beautiful finish that will last for a long time.
The polish will make the surface shiny. That can't be
helped. Brass is a mixture of copper and zinc. Zinc is a reactive metal,
and if allowed to be exposed to the air the zinc can corrode, leaving
the residual copper in a "spongy" state... dark and porous. You don't
want that! So the cleaner/wax will fill the pores in the brass and leave
a non-oxidizing coating.
Auto wax polish/cleaner is NOT a "metal polish" as such. "Blue Magic"
metal polish will clean the brass to make it look new... and leave the
brass virtually uncoated. Sometimes when an old patina is "spotty" and
not uniform, it pays to clean with a metal polish, wipe dry, do not
touch with ungloved fingers, and in 6 months or so there will be a
uniform patina. Then an auto polish will maintain that same patina.
|
 |
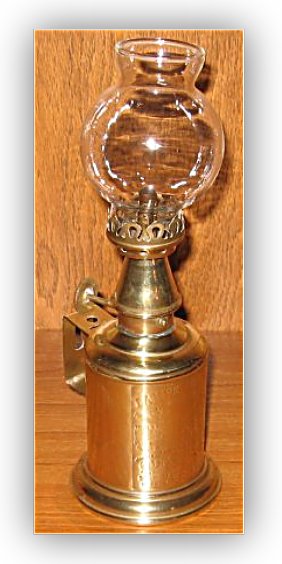 |
Far left, an 1885 Lampe Pigeon as
purchased. The copper surface is dull and prone to oxidation.
Near left, the same lamp after a few
minutes polishing with "Blue Magic Metal Polish Cream" and a
coat of auto polish. The pores of the metal are filled
with polish, so the lamp will stay beautiful for many years
without tarnishing. |
"Blue Magic" auto polish will indeed thin nickel
plating. Normal liquid auto polish will not because it is not very
abrasive. Auto "chrome polish" is lighter still and will clean a very
fine oxidation.
The problem with Blue Magic and Chrome Polish is that they leave the
surface raw, the pores in the metal unsealed. A very light coat of
liquid auto polish, wiped off with a dry cloth, allowed to dry
completely, then wiped off AND removed from all cracks and corners (a
toothbrush works fine for this), will leave the surface in a very clean
and polished state that will inhibit corrosion for well over a year.
You can use the absolute cleaning power of Blue Magic for specific
purposes. Let us say you have a brass lamp that you want to have a
patina, but an even, unblemished "aged look." Clean and polish with Blue
Magic, being careful to not touch the surface to not leave fingerprints
during the final polish and wipe down. Place the lamp on a shelf where
it will not be touched. In six months you should have a very nice,
uniform patina. The longer the lamp sits on a shelf untouched the darker
the patina. When you have the color you want, then apply a light coat of
liquid auto polish to seal the surface and preserve the appearance you
want.
The vast majority of the lamps most of us encounter
are old, but they are not museum pieces that cannot be touched.
Restoration of function is important, as is stabilizing the finish so
they will not corrode. Removing a crummy "age patina" is expected
and right with these lamps, as it restores the lamp to the original
condition so it can be enjoyed by generations to come. Leaving a
lamp with a dry, porous metal finish is simply an invitation to
corrosion and a worthless lamp. Keeping a lamp in "as found
original condition" is in my opinion an excuse for laziness. Some
eBay sellers are very proud of the dust, dirt and grim on the lamps they
sell, proudly proclaiming them in "as found" condition. And those
lamps sell for far less than their potential if only given a little
care, as shown in the examples above. I was the sole bidder on the
Lampe Pigeon at $10.95, and one look at the photo above left shows why.
After 15 minutes of work that lamp is as beautiful and functional as a
new Kosmos Vintner's Lamp costing $65.00, and it has additional value
because it is 123 years old and still perfect in form, function and
appearance.
If a lamp was put away 'wet' with fuel and left for
decades, the fuel will evaporate and leave a gummy residue that
virtually glues all of the parts together. Don't force anything to
move! Read the page on
Beginning Lamp Restoration first.
CLEANING OLD GLASS LAMP FONTS
Question from reader Jeff:
I have some old kerosene lamps
that have red residue left in them from eons ago. I've tried
steel wool, and even paraxylene to get these stains out, and
nothing works. Do you have anything that I could buy to clean
these lamps with? Thanks again, Miles, and I'll be ordering
from you shortly.
******** Kerosene precipitates paraffin - wax. Nothing dissolves
wax, but wax melts at about 160 F. Heating the font slowly in a
double boiler to about 180 F, not even boiling, will melt most of
the residue. The residue floats to the surface, wax being lighter
than water, and can be poured off, then the font retrieved and
wiped pretty darn clean.
THANK YOU, MILES!!..Okay, you've
made a customer for life here with the tip on cleaning kerosene
lamps. I tried this tonight, and these lamps look as good as
they did the day they were made a hundred years and some change
ago. Thanks. Jeff J.
INSTALLING WICKS IN CENTER DRAFT LAMPS
Almost all center draft lamp wicks are provided full length without "tails" because of the great variation in the depth of
founts. Remove the top of gallery and measure the height of the draft tube with a thin stick like a bamboo skewer. That length plus 1" is the proper wick length. Four, two
inch "tails" should be cut in the bottom of the wick. That will give the tails room to splay out when the wick is lowered for extinguishing the lamp. There were literally hundreds of patents issued for
wick raising assemblies for center draft lamps. Many B & H
lamps use a clamp (Penfield patent) which closes to grab the wick securely. Raising
the the clamp to the top engages a wedge which forces the clamps
apart...the wick can then be carefully inserted between the draft tube
and the clamps, then the knob turned to lower the wick, which disengages
the wedge and grabs the wick. Adjust the height of the wick after
you know it will raise and lower properly.
Other types of wick raising systems used sharp pins
to hold the wick securely for raising and lowering. Some lamps had
the the points next to the center draft tube, point outwards, while
others were the Aladdin style with an arm on each side of the draft tube
with the sharp points toward the tube. In either case, slipping a
wick past the sharp points can be a challenge without a wick guide.
With an inexpensive razor knife and an empty plastic jug of Mineral Spirits, making a
wick guide is simplicity itself. (See below)
|
 |
 |
 |
 |
| B&H Penfield patent clamp,
mid-1890's on. |
P&A outside finger clamp
-used pre-1898. |
Rayo wick sleeve, 1905 +. |
Miller Vestal wick sleeve, post
1900. |
|
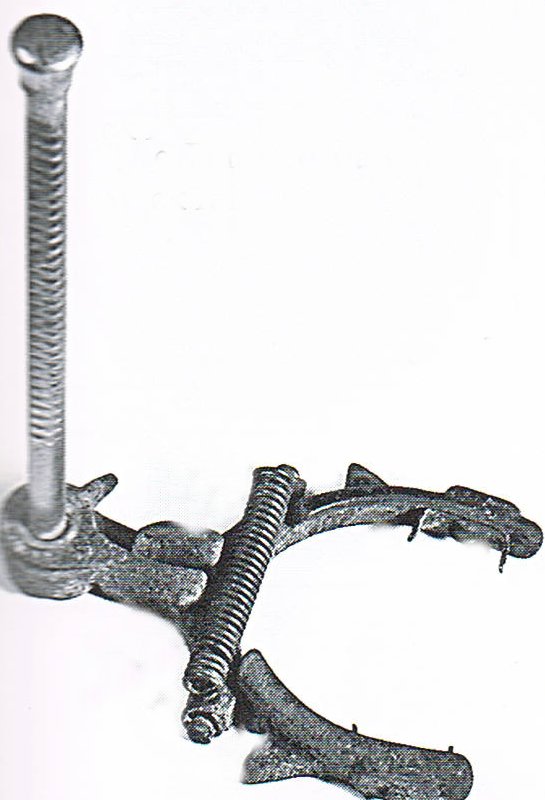
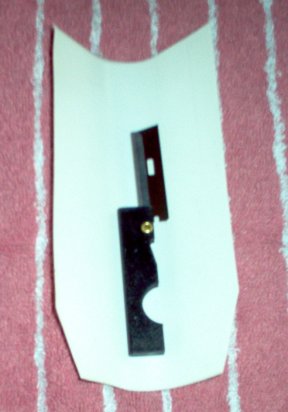
At right is a
photograph of a wick guide made from a corner of a gallon size
plastic jug of Low Odor Mineral Spirits. It is 3 3/4" wide and
6 3/4" high. The stiff, very smooth plastic already has a bend
in the middle because it retains the shape of corner of the
container from which it was cut, so it curls easily to fit the
tube.
If the lamp has the sharp wick-holding
points against the pillar and pointed outward, slip the
wick guide around the pillar, slip the wick over the wick
guide, position the wick at the right height, and simply pull
out the wick guide while holding the wick down.
If the lamp has the sharp wick-holding
points on arms so the points are pointed inward toward
the air tube, slip the wick guide between the arms and the
central air pillar, slide the wick between the wick guide and
the tube, position for height, and then pull out the wick
guide while holding the wick in place below the wick guide
with needle nose pliers. |
 |
WICK HEIGHT FOR INSTALLATION
Heater wicks are installed according to height above the wick tubes. Center draft lamp wicks are just the opposite. Install the wick so it retracts about ½"
below the top of the wick tubes to reliably extinguish the flame when the wick is lowered. The height of the wick, and therefore the amount of flame, is adjusted by the wick
adjustment knob, and there should be a considerable amount of wick available for use so that the wick need not be raised until it has been burned for quite some time.
BEFORE THE FIRST LIGHTING -
LEVELING THE WICK
The new wick must be level on top to avoid
flame spikes. You simply cannot trim the wicks perfectly even with
scissors. Set the lowest section of the wick 1/16" higher than the
wick tubes. Put a couple of eyedroppers full of kerosene on the
top of the wick, put in the flame spreader, light the wick and put
on the chimney. After the kerosene burns off the cotton wick
itself will burn down level with the wick tubes. Rub the charred
wick down with a finger, cloth or stick in a circular motion
around the wick tube to get the charred wick even. Be consistent;
rub the same direction (clockwise or counterclockwise) every time.
This may need to be repeated several times on thick lamp wicks.
Make sure the chimney does not touch the shade or the shade may crack from the heat!
THE FIRST
LIGHTING
The first burning or two should be with
kerosene, as Low Odor Mineral Spirits burn so perfectly that the
wick seemingly does not char at all. Burning kerosene in a
center draft lamp results in a "char" to the top of the wick with
every burn: when the lamp cools down, remove the flame
spreader and rub a finger one direction only to even the char.
After the wick burns perfectly even with kerosene, then you can
switch to Low Odor Mineral Spirits and the wick will continue to
burn beautifully for a very long time.
ELIMINATING FLAME
SPIKES
Flame "spikes" are caused by the wick being too
high at that spot. The height of the "spike" prevents
burning the lamp at even close to maximum light output because the
"spike" will cause sooting if raised too high: a full
"tulip" flame or even a decent curl of flame is simply not
possible to attain.
Don't even try to trim the wick with scissors -
it won't work because the top of the wick would be "clean" and not
have a char like the rest of the wick top. To correct
this problem and make the wick perfectly level on top, let the
lamp run out of fuel. When the flame dwindles because the
wick is almost out of fuel and thus "dry," lower the wick until
only 1/16" or so of wick is exposed above the draft tube. DO
NOT BLOW OUT THE FLAME! Move the lamp to a place that is
relatively draft-free yet ventilated and let the wick burn out on
its own. The wick is cotton and will itself burn down -
exactly 1/16" - level with the top of the draft tubes. Remove the
chimney and flame spreader and rub a finger over the top of the
wick in one direction only - make one or two "circles" around the
top of the wick to even the char.
EXTINGUISHING A LAMP
The best way to extinguish a lamp begins with
proper wick installation, as above. The wick can then be lowered
so it is 1/2" below the top of the wick tubes. There will be
residual fumes because the heat from the burning flame heated the
fuel in the fount and on the wick. After the wick is lowered
there will be some flame that will quickly dwindle to a "circular
dance" of flame as any residual tar and carbon deposits on the top
of the wick tubes or flame spreader are burned off. The chimney
will also cool naturally during that time. When the flames are
virtually gone, then the flame can be blown out by blowing down
the chimney. The cooler chimney will not experience a radical
temperature change that would result in immediately blowing out
the flame, and that will lessen the chance of cracking a
chimney. If plain glass chimneys could take radical temperature
shock there would be no need for the borosilicate chimneys I sell.
CORRECT WICK
THICKNESS
Wick thickness and weave is incredibly
important. Victorian era lamp manufacturers were in intense
competition to produce lamps with the greatest possible light
output per fuel consumption, and their methods of achieving that
were different. Miller designed the easiest wick replacement
system and brilliantly designed flame spreaders to achieve a tall,
white light from a thin wick. P&A used a nominal 1 1/2" diameter
wick on their Royal burners which was thicker on the outside
of the wick to induce greater capillary action and thus produce a
fine white light with the same draft tube measurements as a Miller
or B&H. The L&B "Belgian" 30''' lamp used a nominal 1 1/2"
diameter wick with the extra thickness on the inside of the
wick, requiring a smaller diameter draft tube. The Belgian
30''' design
was so superb that is was copied by B&H's Radiant #5, P&A's Plumwood, and Miller's Dresden, Liberty 2/0 and Empress.
The L&B Belgian 20''' lamp used a thick 1 1/4" wick of the same nominal diameter as a Miller
#1, but thicker on the outside of the wick - and was copied by
Success and the B&H Radiant #4. The Rayo Jr. used a
thick 1" diameter wick. None of these wicks are interchangeable!
I had to have the specific wicks made using original wicks as
samples.
Wicks which are too thin do not fill the wick
gap; the wick itself can burn down the wick tube, and if not put
out in time can cause a fire/explosion in the font. For
example, a Miller #1 should never be burned in Success, Radiant #4
or Belgian 20''' lamps.
My wicks are designed to ensure the same
capillary action as original factory wicks - and thoroughly tested
by lamp experts in a variety of lamps. (Thickness and dimensions listed on
Lamp Wick page.)
Large, circular wick, center draft lamps should be
burned at near maximum light output to properly heat the flame
spreader to burn up all fumes. If used turned down to minimum
light output, they will produce an aroma when
burning, but not when properly adjusted for maximum light output.
The exception is the tiny lamps, like the Tiny Miller, Little
Jewel and Tiny B&H: these miniature center draft lamps
should be burned with no more than a 1" high flame front to avoid
overheating the fuel.
KEEP LAMP BURNER
VENT HOLES CLEAN AND CLEAR
|
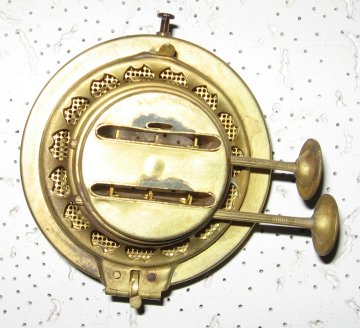 |
There is a small air vent in virtually
all lamp burners, which is a safety feature to keep air
pressure equal in the tank even with a solid fill plug.
The vent hole must be keep clean and clear of obstruction.
The photograph at left shows the bottom of a duplex burner, but
single wick burners also have a vent. Click on the photo to enlarge it
to see the vent tube directly above the top wick slot.
|
|
Burner Repair.
See the three star wheels attached to the shaft in each wick
slot above? Those cog toothed star wheels must turn in
fairly precise slots, and if one tooth is bent the wick will
only turn back and forth until the bent tooth hits the side
of the slot. Look closely and you should be able to
identify the bent tooth. Gently push the errant tooth
back into alignment with a thin bladed screwdriver, then try
the wick raising knob again. It may take a few tries, but it
is often possible to make a seemly broken flat wick burner
work again just like new. This is also the time to
gently push any dents in the fairing above the wick back
into place, which will result in a smooth air flow over the
wick and thus a nice, even flame. Be gentle. All
of these parts are usually brass. |
CENTER DRAFT
LAMP CHIMNEYS - go here
Back to top of page
|
Home Page Click Here
Wicks for kerosene space heaters,
click here.
Lamp Wicks:
Center Draft Wicks - Wicks
available only from this Wick Shop.
Flat lamp wicks
Aladdin Lamp Wicks
& parts
Lamp Chimneys:
Center Draft Lamp
chimneys
from "Tiny" Junior to Mammoth lamps.
Fabulous "Sans Rival"
borosilicate chimney for 14''' Kosmos lamps
Student Lamp Sans Rival Chimney with
1 7/8" fitter!!!
Standard glass lamp chimneys
Sonnenbrenner Lamp Chimneys
Information on lamps:
Center Draft Kerosene Lamps
(Photos, information and history, etc)
Photos of
restored center draft lamps
Beginning Lamp
Restoration
Care
and Feeding of Center Draft
Lamps
(and wick
installation for many)
Center Draft
Lamp manufacturers and brand names
Lamp Chimneys
- Dimension of
nominal base diameter by make, model and "line".
Early American Metal Font & Specialty Lamps
Aladdin Lamp History
Aladdin Lamp Wicks & Chimneys,
Aladdin - Exploded burner views
Kosmos-Brenner lamps
and wicks
Flame Spreaders and
"Smoke
Consumers"
from Alex
Marrack
-
Vulcan, Imperial, Veritas,
Belgian, Hinks, Messenger's, Young's Court, etc.
Articles by Alex Marrack:
Home Page
Site Index
Site Index for all things Perfection
Kindler Wicking For Oil Stoves & Ranges
Kerosene Heaters
Alphabetical list of most kerosene heaters and the proper wick,
& cart checkout.
List by wick number and the heaters that fit them. (A
helpful guide for buying on eBay)
Back to top of page
|