ea
BREAKING
IN NEW KEROSENE APPLIANCES
Any new appliance
should be treated with respect. Before use, all exposed metal surfaces
should be given a coat of good automotive polish to seal the pores of
the enamel finish and help preserve the finish. Before storage in late
spring, they should again be cleaned up and given a coat of polish. Polish
is cheap, and you paid good money for the appliance. Why not keep it in
good condition, as it only takes a few minutes a year to do it?

Kerosene Heaters
Familiarize yourself with the details of the unit. Carefully remove the
burner unit and raise the wick. Note the appearance and height of the
wick. With most kerosene heaters, the wick should protrude about 7/16 inch
at maximum height, and completely retract into its slot when in the off
position. (With radiant units, the grill can be opened and the burner
removed. With convection
units, three perimeter screws around the base of the tower must be removed,
then the circular tower carefully lifted straight up and removed to gain
access to the burner unit.)
Polish the metal cabinet inside and out. The
grillwork must also be polished. The unit may then be reassembled
and be ready for fueling. A half hour after filling the tank with
fuel, the heater may be put into operation.
The polish you applied has sealed the pores of the
paint, so spilled fuel will not tarnish the paint (enamel), any soot or
grime will wipe off easily, and the heater will be easy to service before
storage for the summer.
For heaters, skip down to Initial
Seasoning.
Kerosene stoves with normal wicks that
rise should have the wick trimmed to the height of the trimming guide
visible when the catalytic converter is removed. The saturated wick
design used on some Butterfly stoves (#2413, 2416, 2418, etc) is unique in
that the wick itself does not move, but rather the fuel flow is what
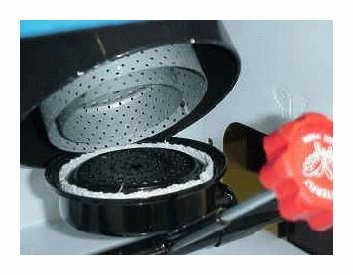
controls the heat output. The catalytic converter of these Butterfly
stoves is virtually identical to all other catalytic converters, so the
illustration below is graphic enough to show you what the inside of a
catalytic converter look like. Click to enlarge.

The
reason for the exercise mentioned above is because it
will become a regular ritual, so you might as well see how easy it is
to do...the units are all designed for this. Reassemble the unit in the
reverse order.
Initial
Seasoning of Kerosene Stoves and Heaters
Your unit, regardless
of type or style, is now ready for initial seasoning. Take the unit out
of the home, say to a garage or covered patio for ventilation. This will
protect it from strong drafts and from rain for this session. Pour at
least a half gallon of kerosene into the tank, then let it be for at least
a half hour so the wick can become fully saturated.
After the half hour,
light the unit with the wick set at the maximum height, and let it burn
in that position until the burner is completely red and flames of 1" appear
above the top of the burner. Then turn the wick down about half way between
the high and low settings and let it burn. During this initial burning,
all of the preservative oil on the combustor unit is burned off (smelly),
the metal becomes properly annealed, the enamel surfaces are fully cured,
and the entire unit "conditioned" to its designed configuration for use.
After hours of burning, the flames will begin to die down and the upper
part of the burner unit will change color from red to black. Now is the
time to turn the wick to its maximum height and let it burn. It will take
at least another hour before the flames die out, and then the tar residues
on the top of the fiberglass wicks will burn off (very smelly).
The reason for this
initial seasoning burn being done at a reduced wick height is because
the new wick is in pristine condition, so its capillary action is at maximum
capacity. By burning the wick dry during the first burn, the wick itself
becomes seasoned and will last considerably longer in use.
Your kerosene appliance
is now ready to give you years of odor free performance. Inexpensive kerosene
appliances in particular will perform much better if properly seasoned.
Remember that
kerosene appliances need
regular
maintenance.