|
Top
WICKS TO FIT THE HEATERS LISTED
BELOW - AND MORE!
Unique Specialty wicks
for
19th Century lamps
|
 . . . .
World's Largest Selection of Wicks!
Wicks for virtually every heater, stove and lamp made since 1850
Mini
Kerosene Heaters From
Around the World
Mini heaters can be very
useful!
Making
a chimney - Repairing leaks in the font
- European mini-heaters
Zenith
Chimneyless Brooder Heaters
Before rural electrification began in the late
1930's, many homes and farms in the countryside used small kerosene
heaters to warm milk houses, keep pump houses from freezing, and use in
brooder houses to keep poultry from freezing - and just as important, to
keep their water from freezing. Many of those small kerosene
heaters survived and can be found for sale on eBay at quite reasonable
prices.
|
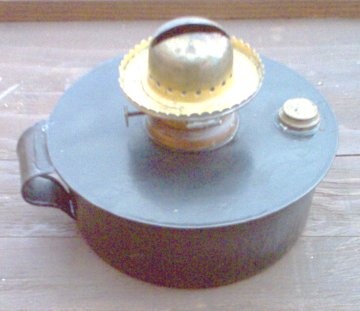 |
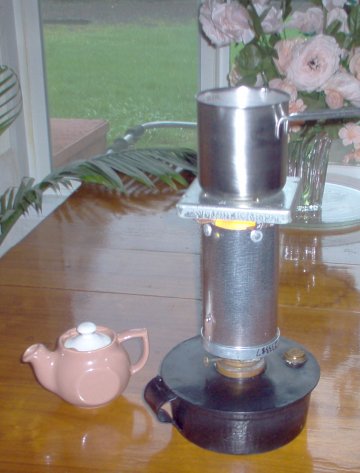
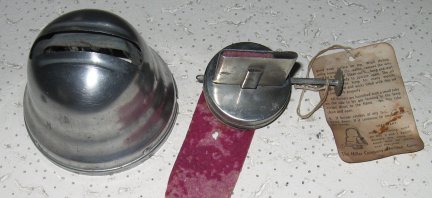
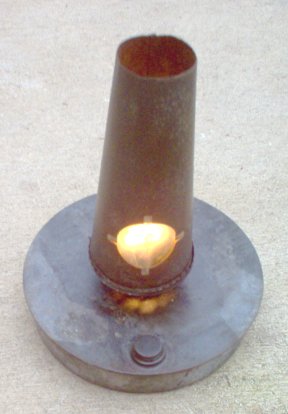
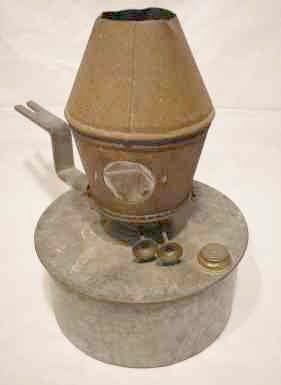
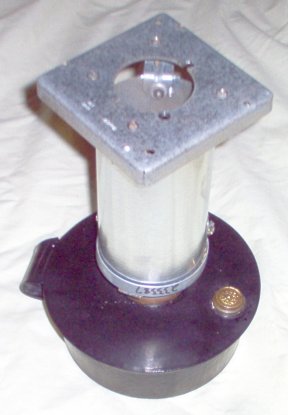
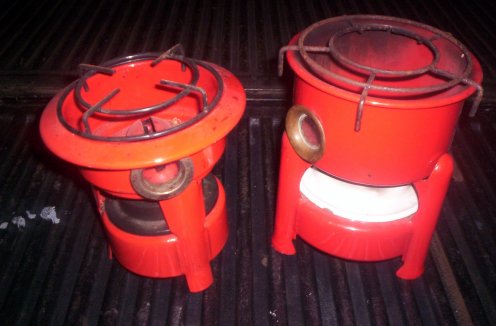
On the left is an 19th
Century P & A
"brooder house heater" I purchased on eBay for $10.95.
It looked very scruffy on arrival, so I cleaned it up,
polished the brass wick assembly, and painted the base
black. This heater uses a 1 1/2" flat
wick to produce about 1,700 BTU/hr. I have the
proper wicks in stock, so
wick replacement was easy. Note there is no chimney,
and a kerosene lamp or heater will not burn properly
without a chimney. A glass chimney is not proper:
these heaters used a metal chimney, in this case one 3 3/8" wide - an odd size. The entire top of the wick
assembly is hinged to open for wick trimming and lighting,
so a chimney fastened to the top is feasible.
|
"Proof of Concept" Testing
|
 |
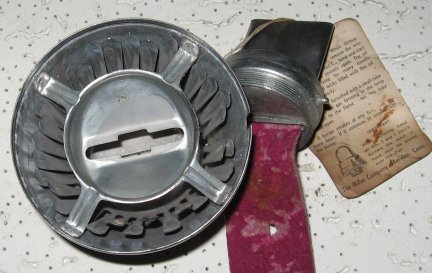
It is extremely rare to
find a century-old brooder heater with an intact chimney, as
they were made of very thin metal and rusted quite readily.
Using a piece of 4" galvanized steel chimney pipe, I pop
riveted the chimney shown at left and below on the right.
I had a very sturdy electrical outlet cover with a 2 1/8"
hole in the center, so I used it for the top cap. This cost
me only $3.79 for the chimney pipe and a few pop rivets.
It will heat a cup of soup to boiling in 15 minutes and
burns kerosene clean, but it burns better with
Low Odor Mineral Spirits. Two cups of water are steaming after only 15
minutes in the photo at left, and it made excellent tea!
The P & A "tip over" burner makes
lighting and wick trimming easy. I made a very handy
little heater/stove from a cast off brooder house heater for
very little expense - and put a 19th century appliance back
to useful work. Not everyone can cut steel and pop
rivet, so.....
|
Now it is easy to
make_a_chimney!
|
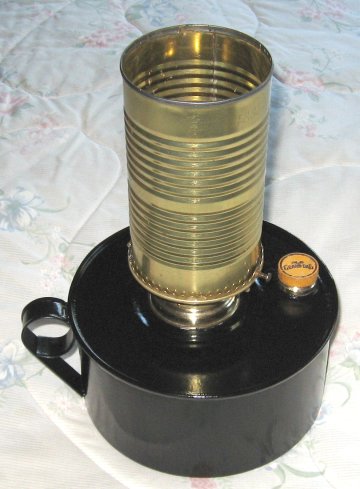
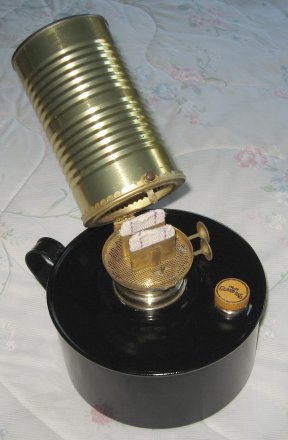
....I kept looking for a viable off-the-shelf
chimney...and found one literally off-the-shelf. At right is
a photo of a mini-heater before expanded metal was put on as a
cooking grate, as illustrated below. Notice the beautiful
chimney that fits perfectly? It is a family-size Campbell
soup can. Now there is no excuse for anyone to have a
brooder heater without a chimney! In fact, it is of thicker
and stronger steel than the original chimney, and should last for
decades. Click on
photos to enlarge them. |
 |
|
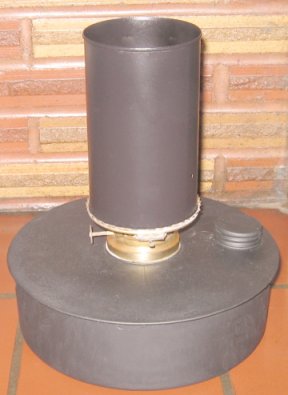
At right is a Miller brooder
heater with a rare internal baffle to prevent fuel sloshing.
The burner uses a 1 1/2" wide flat wick, so it produces
sufficient heat to make a can of soup edible, etc. The
pretty straight sided chimney was made by cutting the ends off
a Boston Brown Bread can. This particular brooder heater
required the bottom (crimp on end) of the can to be bent in
slightly to fit into the slot for crimping in place. The
flat black paint on both the font and the chimney is 1200
degree F engine enamel. Later I will fit an expanded
metal cooking plate on top using single-sided electrical
conduit clamps as the support brackets. |
 |
The details
|
 |
 |
 |
 |
|
Bottom of duplex burner.
Notice the small air vent above the top wick, designed to keep air
pressure equal in the tank even with a solid fill plug. Keep
it clear! |
Top of duplex burner. The
tabs around the top edge must be bent up straight, the chimney
inserted, then the tabs bent against the side of the can just
enough for a firm hold. |
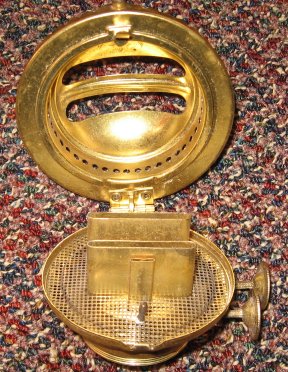
Hinged chimney open.
The unusual double-wick gallery is shown. This
mini-heater with two 1 1/2" wicks can produce serious heat for
cooking! |
A perfect chimney is shown
above. Boston Brown Bread may also be used, or any can of similar base such as family size Campbell Soup or pineapple cans (below). |
A 20 oz Pineapple Can Chimney

|

|
|

|
Three different styles of Miller Brooder Heaters using a 20 oz pineapple can as a chimney.
Left to right: small single wick, side handle; larger single wick with two "eyes" for hanging; duplex burner (two wicks) with a flat
style handle on the side. The top and bottom of the pineapple cans were removed, the paper label and the label glue removed, then the cans were
painted with 1200F black engine block spray paint. The 20 oz pineapple cans are not as tall as Boston Brown Bread cans, but with a rim diameter of 3.380"
they fit well and burn just fine. This time I used green Rustoleum spray paint for the founts. |
One more time
|
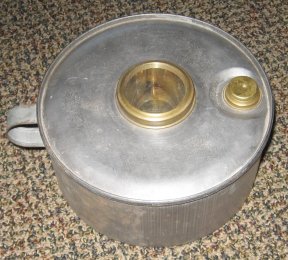 |
An original, NOS
Miller brooder heater tank. A little rusty on one side from
a century of storage, so I scrubbed it with a nylon pad and
washed it in acetone preparatory to painting. At
right, the duplex burner ready for two 1 1/2" wide wicks.
Click photos to enlarge them. |
 |
|
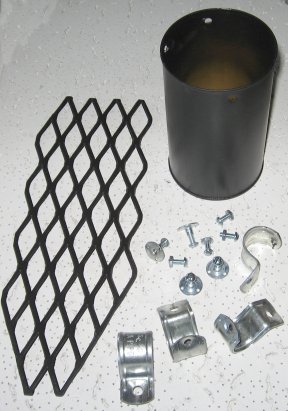 |
The assembled parts needed for the
chimney. I used 3/4" single-side conduit clamps
and "Tee nut fasteners" (10 x 24)
to hold the expanded metal above the chimney. The
chimney is a Boston Brown Bread can, both ends cut out and
painted with black 1200 degree engine paint. |
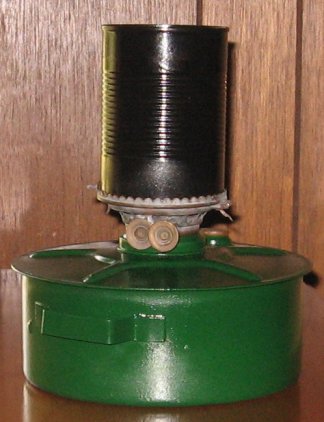
|
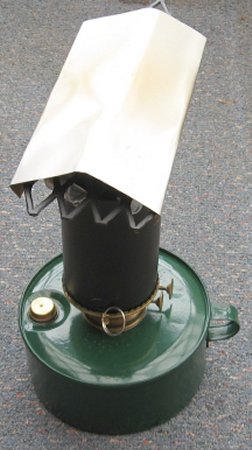 |
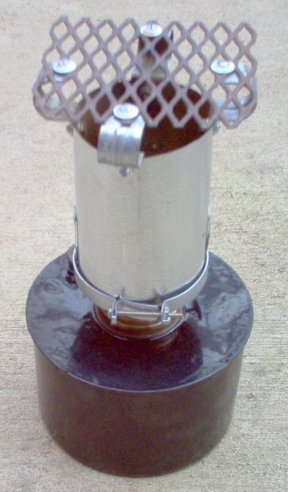
The finished mini-heater. Note the split key ring
through the gallery to lift the chimney - it gets hot!
The base was spray painted with forest green Rustoleum.
The heat deflector was cut from a 4" aluminum dryer vent,
and slides across the expanded metal. Now it is safe
to use as a heater under a vehicle (with sufficient
clearance, of course), in a greenhouse, etc. By
removing the heat deflector the mini-heater is converted
into a nice little stove for cooking, heating water for
coffee or quick meals, whatever. |
|
 |
Miller also made a half-size brooder lamp. The one shown at left uses a 7/8" wide wick rather than the standard 1 1/2" wide wicks used in the brooder lamps above.
I have cleaned this one. Now it is ready for final polish and paint. These smaller brooder lamps had a 2 5/8" crimped-heel section for a chimney. In
this case, a metal can salvaged from a Slim-Fast drink fit perfectly! |
|
 |
English Greenhouse heater from Norfolk
Products, 55 Wilbury Way, Hitchin, Hertforshire, Sg4 Otw
England. My heat deflector (above) is not as pretty,
but mine works just as well. This English heater is
rated at 2,100 BTU/hr from two 1" wide wicks. The
duplex heater I made (above), using two 1 1/2" wide wicks,
must therefore produce in the neighborhood of 3,000 BTU/hr.
Not too shabby! It cost me $55 to import the English
Greenhouse heater several years ago, and only half that for my new Miller duplex mini-heater
with all the parts and pieces added.. |
Comparison with original brooder
chimneys
On the left is a turn of the century brooder chimney
for a duplex wick heater. The center photo is of a 1940's era
brooder chimney which does not have a tip over burner. My homemade
chimney is on the right. All are metal to dissipate heat properly.
The originals worked, but mine are strong enough to support a full tea
kettle...and heat it to boiling!
Zenith Chimneyless Brooder Heaters
|
Miller made some very interesting burners which were
designed to burn correctly without a chimney. Of course an open
flame is a safety issue: these burners were intended for burning
inside a metal housing. The burner could heat the metal which
would then give off heat to keep chicks and chickens warm in the
winter. Flocks hate to be disturbed when nestled for warmth, so
the metal cabinet could have an outside hatch for inspection and
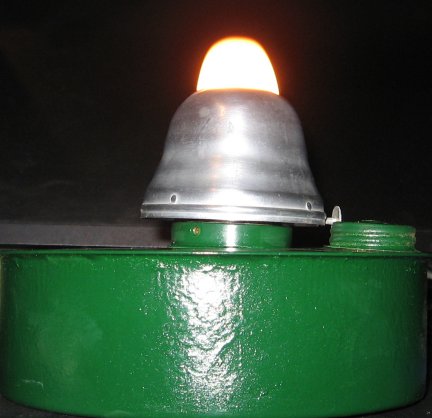
refueling of the brooder heater. Notice the flame in the
photo at right: steady, perfect flame and a nice, hot white.
The draft design was perfect (see below right).
|
 |
|
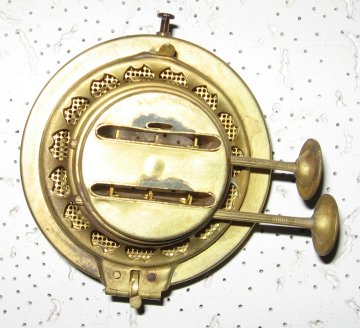
Disassembled to show the parts.
Note
the felt wick! It is not woven cotton. |
 |
|
The solid cap at left fit over
the wick raising assembly in the middle of the photo.
The threads were the same #3 as a 1 1/2" normal brooder heater
burner, single or duplex. |
The draft is controlled and
regulated by the fingers shown in the upside down burner cap
above. They moved air past the wick perfectly for an
even flame after they are warmed up. The tag above says: |
|
IMPORTANT: For safe and
satisfactory operation of your Zenith Chimneyless Kerosene
Burner follow these directions carefully.
1. Allow
ample time (at least 15 minutes) for flame t rise to its
maximum height before turning to the height desired. This is
necessary because as the lamp gets warmer from a cold start,
the flame will creep higher. If this creepage is not
allowed for and the flame is turned too high at the start, the
flame will become much too high as the burner warms up.
2.
Remember - a low or moderate flame will give more heat and
will not smoke and have carbon deposits.
|
3. Keep
wick in good condition - even and flat on top. Do not
cut it unless badly burned down. Just rub off charred
portion with a cloth or fingers then pat down until you get
a good even surface on top. When through
using burner for the season, remove the wick and let it dry
out. Clean out the lamp and start anew when ready to
operate again. The oil standing in the lamp for many
months becomes rancid and wicks filled with this oil will not
work properly.
4. All burners are furnished with a
small tube on the side to let gas forming in the lamp escape
direct to the flame. keep this tube open and clean.
5. If burner smokes at any time, turn the flame down.
If it continues to smoke, clean the burner. |
|
Important:
When replacing hood on No. 2 and 3 Zenith burners the notch in
the hood must be placed over the shaft. The
Miller Company. Meriden, Conn. |
|
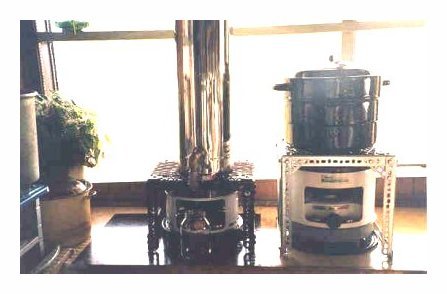
This is how I will use my Zenith
Chimneyless Stove.
At right shows kerosene
stoves under cooking stands which I use for canning. I
do not like to set a heavy pot directly on a stove. It
is easy to bolt together a cook stand from 1 1/2" "L" slotted
steel strapping. The Zenith Chimneyless burner is far
from producing enough heat to boil a big pot of water, but
will keep a pot of water hot enough for washing, etc.
The Zenith stand will be 14" x 10" and 9" high so the
brooder heater can slide under and be close enough to the
pot (no chimney!) to produce good heat directly on the bottom
of a pot or pan. |
 |
Repairing_a_font:
It is not uncommon to find pinholes in the base of
the fuel tank on century-old brooder heaters. Then they leak fuel.
My latest find (above, with the soup can chimney) in early February,
2007, had a LOT of tiny pinhole leaks. I sanded the base
smooth, picked at the holes with a stout sewing needle to clean
debris from the holes, removed any oil from the metal with acetone, and
applied a thin layer of J-B Weld epoxy over all areas that even appeared
to have indentations or pits. After drying/curing, I sanded the J-B
Weld smooth, put the tank on a piece of newspaper, and poured in some
fuel. It worked! No leaks. J-B Weld epoxy can be
easily applied with an artist's paint trowel, so little sanding is
required. Of course all the sanding required to get to bare metal
(so the epoxy will stick) removes the galvanizing, so the tank
must be painted with an anti-rust type spray paint to prevent
future rusting.
The trick to success in sealing the leak is complete
cleanliness before applying the J-B Weld. The tank must be emptied, wick
assembly removed, sanded or whatever to clean the entire area where the
leak is, then repeatedly brushed with acetone to remove residual
kerosene. A thin layer of J-B Weld pressed into the seam or over the
leak with an artist's trowel, then smoothing, will seal the seam. Let
dry in that position for two (2) very long days. Then put enough fuel
into the tank so it is 1" high on the bottom, set it on a section of
newspaper, and watch for leaks. The newspaper will tell you if there are
any leaks and where they are located. Then and only then can you again
empty the tank, clean and sand, and paint with a zinc based paint like
Rustoleum.
|
 |
 |
 |
| Pictured above
at left, my second model mini-heater. On this one I used a
5" square of expanded metal for a cover plate. The center photo is
of a cheap brooder house heater (not a P & A) which uses only a 7/8"
wick. It has a mica window in the chimney for candling eggs, but
the poor design of the burner allows it to smell when burning. The
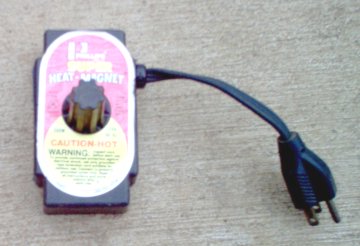
photo above right is a standard 110V heat magnet. |
ALCOHOL OR KEROSENE FOOD WARMER
FROM THE EARLY 1900'S
|
 |
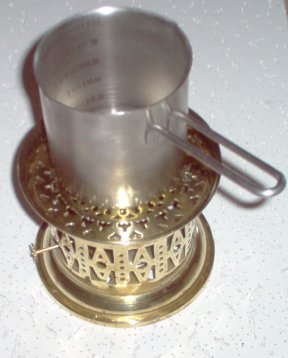 |
At left is a small alcohol
"crepe suzette" restaurant table cooking stove circa 1900.
All filigree brass except for the burner, which is steel.
Uses a 3/8" wick. Photo near left shows the stove
heating water in a heavy stainless steel 2 cup measuring
cup.
From my collection.
|
EUROPEAN MINI KEROSENE
HEATER/STOVES
While American mini kerosene heaters were mostly of
the farm or automotive style, there were several fascinating designs of
small kerosene heater/stove combinations made in England and the
Continent.
These stoves could be used in small "flats" in the city for cooking, or
for use in trailers ("caravans") or cabins. In fact, the last
listed reference for the Harper Beatrice stove shown in the middle photo
below referred to it as a "boiling stove," and it certainly well
designed for that use: I can boil a tea kettle on it within 15
minutes, and it will easily boil vegetables, meat, rice, whatever is
needed.
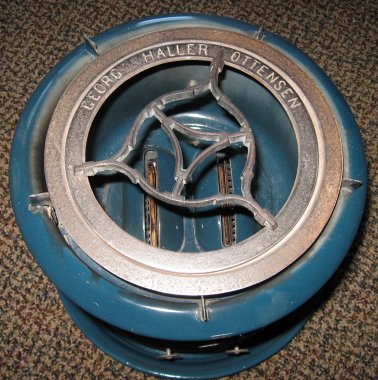
Above, left, is a Haller "Origineel"
stove made by Georg Haller Co of Ottensen (Hamburg), Germany. Haller
stoves date from circa 1900,
but some variations (clones)
were made in the
former East Germany and are marked DRG. It is of enameled steel construction. The
white area visible at the bottom of the stove is the wick holder, and
the venting visible allows a considerable amount of fresh oxygen to feed
into the 2 9/16" flat wick. This stove burns very clean and
odor-free. The fuel reservoir is primitive, however, being nothing
more than a basin for the wick, and care must be taken to prevent
spilling. I
found this stove on eBay in as-new condition, right down to perfect gold
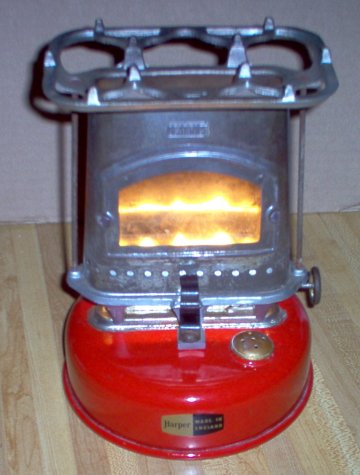
leaf lettering. The middle photo shows a late model Harper
Beatrice stove made by John Harper & Company Ltd., Staffordshire,
England. The
tank is relatively modern in design, well sealed, and does not spill
fuel. The wide 4" flat wick and well-designed ventilation area
allow sufficient oxygen for good, odor free combustion. I assume
this stove was made in the middle 1900's based on the design, not on any
readily available information, and as you can see, the stove was in
as-new condition when I bought it, so it is very difficult to date the
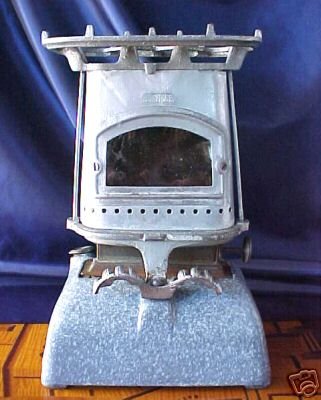
time of manufacture. The photo on the right shows a
Beatrice Foundry #33 Boiling Stove (England) with an enameled, cast iron base,
and marked "1901." A close
examination reveals the flue section of both Beatrice stoves to be
virtually
identical (the #33 chimney has more depth), complete to the pot/pan rest on the top of the units
and the wick assembly. These are well designed stoves and burn
clean and odor free when burning Low Odor Mineral Spirits.
|
 |
 |
 |
|
Haller 2-wick stove |
Haller 4 wick stove |
Haller 4-wick with 1-wick on
top for size comparison |
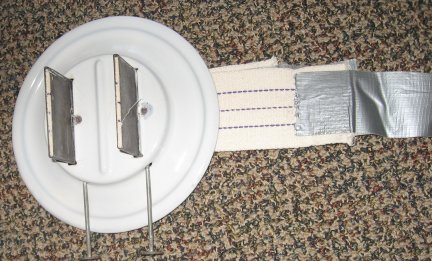
Replacing a Haller wick
|
A thin wick extension is made
from duct tape, then the duct tape fed down through the wick
slots through the gearing. The wick is then pulled down. This
method avoids any undue force on the gearing used to raise and
lower the wick. |
 |
Beatrice Boiling Stoves:
Note from Mike at The Base Camp in the UK.
http://www.base-camp.co.uk/
Oct. 14, 2012
I have information from John Harper, the last Director of
the Company. The Beatrice #33 range was introduced around 1928, early
versions had rounded ends to burner the gallery and during the 1930's
had the casting date underneath. The '1901' stamped all around #33
stoves until they ceased production in the early 1970's refers to the
1901 pattern of 'bridle' used to secure the burner without screws to the
tank. This was originally patented in the 1890's and first used on the
Beatrice #1 stove. I hope to get a small book printed in the future
detailing these sturdy workhorse stoves which are often overlooked for
the more glamorous brass stoves. The #33 stove in your collection has
the square ends to the burner gallery introduced in 1934 and the
decorative handles dropped for the plain style in 1945 so should be from
between these dates. Beneath the tank should be a small casting boss in
the centre of the tank, with 'Made in England' in raised lettering. Post
1945 there was a large casting boss in the centre of the tank.
|
 |
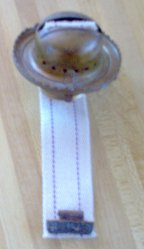
On the left is a photo of an
original Beatrice 4" wick taken from the red Beatrice Boiling
Stove above. At the bottom is my new Beatrice 4" wick -
a clone of the original wick.
Wicks are available
here.
|
`
|
CAUTION!!! As with any
kerosene appliance, these mini heaters need to be broken in
by burning at maximum temperature OUTSIDE or in a shed,
particularly if using galvanized metal for the chimney or
top plate. You want to avoid breathing the toxic fumes
from burned zinc (galvanizing). Once broken in, they
can be used indoors, but their primary utility is for use as
described above - in small utility buildings.
|
`
|
 |
A clean burning kerosene
lamp or mini heater depends upon the delivery of clean fuel to a
good burner assembly designed to admit the right amount of
air for complete combustion. Wide wicks, such as the 1
1/2" wick shown at left, only compound the problem. We
cannot change the design of the burner unit, but we can make
sure the proper amount of fuel is raised to the top of the
wick via capillary action. Most fuel reservoirs are less
high than the wick is long, so the wick tends to curl.
Wide wicks have a tendency to float and curl, and when the
fuel reservoir is less than half full, much of the wick can
be above the fuel...lousy capillary action, poor combustion,
and an aroma when burned. By sewing a small auto wheel
weight to the bottom of the wick as shown at left, the wick
is always immersed to
the full depth of the fuel, providing
full capillary action and a nice clean burn with no kerosene
aroma at all. |
These mini kerosene heaters are very
versatile!
The ready availability a small heater which produces about 1700 BTU/hr
for 48 hours on less than a quart of kerosene can be very useful in many
situations, limited only by your own imagination. With a total
height of 11 1/2", these mini heaters are short enough to fit under some
vehicles to keep the engine blocks and radiators from freezing in very
cold weather, but care must be taken to avoid placing them directly under
rubber belts or oily parts which could become too hot for safety...and
if it's windy, a tarp should cover the vehicle so the heat is not blown
away. They can be placed in a well pump house to keep the pump and
pipes from freezing. They can be used in a stored travel trailer
or motor home to keep the water pipes from freezing, but care must be
taken in their placement so the heat does not rise directly under a
wooden cabinet, for example. They can be used to keep the chill
out of small greenhouses to protect overwintered plants, or protect
transplants against a late frost. These mini-heaters are very
inexpensive insurance against sudden freezing weather conditions.
Just make sure if you buy a brooder heater that it was made by P & A
or MIller if you want the best model for clean
burning. I've got some awful smelly burners that are still good
for heating a well pump house, but too inefficient burning to use
indoors.
It's a dark and stormy night. The temperature
is below 20 F, the wind is howling from the North, and the electric
lines are covered with ice. Your well pump has an electric heat
magnet attached. The storage building for your snow blower and/or
ATV has an electric heat magnet attached to the engine block. If
the electricity goes off in the middle of the night you would never know
- and your well pump could freeze and crack and the snow blower or ATV
would not start in the morning. But if you have a simple brooder
house heater in the well house and/or storage shed, it doesn't matter if
the electricity goes out - you will have saved an expensive pump from
having to be replaced in miserable weather, to say nothing of the $400
or more expense of a new pump!
Back to top of page
|
Home Page
Site Index
Emergency Oil Lamp! - Ready to
use!
Click here. NEW
Kerosene Heater Wicks:
Kerosene Heaters
Lamps
Home Page
Site Index
Photo Album
Photos of
Wicks
Mail Order
Form
Back to top of page
|
